Prior to receiving the survivor, we sincerely believed that The SSD Review Test Bench simply would not fit into that case because of the size of the CPU Cooler, Graphics card and array of storage devices. We even e-mailed BitFenix and had to ask, “Are you sure?’ to which the answer was that we would see soon enough.
CHASSIS AND INSTALLATION

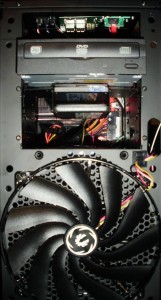
The chassis of the Survivor is unique, in that, I don’ t think that they could have thought of anything else to make this such a perfect fit for power users and gamers. The very first thing we did was install the DVD recorder and followed with the installation of two ssds below that in one of the upper bays. The unit came with a brack assembly which made the drives the perfect fit once assembled as shown in the left photo with the SSDs assembled in the right. Realistically, one could get 6 SSDs installed up top, followed by another 7 in the lower cages and one more under the bottom cage fastened to the chassis.

.
.
.
.
.
We then installed the rest of the SSDs and hard drive before installing the motherboard and CPU cooler but lets take a look at the interior in order to understand all the brainstorming that actually went into putting this chassis together.
The first thing that we did was install the power supply followed by the motherboard and everything slid easily into place with all holes matching up perfectly. The cutout in the motherboard base was absolutely perfect for the standoff support under the CPU cooler. The chassis already has a great deal of cabling, all of which was tucked away into the unit with lots of room for our wiring needs as well.
On the right, one can see modular bays which can accomodate up to 7×3.5″ or 9×2.5″ hard drives or SSDs. The interesting thing we noticed was that the modular bays slid out easily with a click and could make room for any abnormally large PCI cards if need be. As well, the bracket with each bay slides out for easy installation of the drive onto the bracket. At the end of the day, we know we can use a course in cable management ourselves but here is the final product with all components installed, including 5 solid state drives, a desktop and laptop hard drive.
COOLING
You may have noticed that there are two enormous 200mm fans on the front and top of the BitFenix Survivor, the front fan drawing cool air into the Survivor while the top pushes the hot air out. Both can be swapped out and the unit equipped with 7x120mm fans for even better flow. There is also ventilation under the power unit (PSU) and on the back of the case. Interestingly enough though, the intake fans on the front and under the PSU both have filters which can easily be removed, cleaned and re-installed. From a personal view point, our Test Bench is not only much quieter in the Survivor but runs cooler as well.
 The SSD Review The Worlds Dedicated SSD Education and Review Resource |
Excellent review of an exciting new case. It would have been a tough choice between the Lian Li PC B-10 and BitFenix if the Survivor had been available in December 09 when I spec’d out my current PC. The glowing, red winged logo is a bit gaudy for my taste and could be annoying in a darkened room. Other than that it’s a beautiful case with lots of attention to detail.
I’m also leery of top exhaust fans adding to noise levels being more interested in quiet, reliable function as opposed to gaming. If they make the top opening optional Survivor could be my next case!
RESPONSE: There is a switch for the LEDs in the top I/O Panel or you can disconnect that on the logo to your liking. The air flow in this is very unique and I find it very quiet and cool but I am coming from an open bench setup. Thanks for the comment!